Blending and windows
Blending and windows are basic graphical effects you can apply to backgrounds and objects to change how they appear on screen. Blending is used to fake transparency, or to fade the screen towards certain colours. Windows can be used to change what is actually rendered to the screen in certain places.
Blending
Blending lets you apply a few effects to the screen as almost a post-process step. You can use it to create a lightning effect or just to make an object slightly transparent.
There are a few things you can do with blending which enables you to emulate alpha transparency effects along with a few other basic effects. The two key concepts that you need to keep in mind with any blending effect are:
- Blending a a single global property. So if you want some level of alpha transparency, then everything with alpha transparency enabled will have the same level of transparency. Similarly, you can only apply 1 blend effect at once. So if you want to fade something to white, then you cannot have alpha transparency.
- Blending happens between two layers.
Layers here are more abstract.
They can be any subset of the currently rendered backgrounds.
But only objects with a
GraphicsModeset toAlphaBlendingwill be counted towards the layer which has objects enabled.
To configure blending, call the .blend() method on the current frame.
Nothing will change on the screen until the call to frame.commit().
You can only have one blending style at a time, and each time you call frame.blend().<style>(), you overwrite the previous one.
Object transparency

You can make all objects with the GraphicsMode set to AlphaBlending to be partially transparent using the .object_transparency() blending.
In the example on the right, the lower crab is blending into the background below it.
The object_transparency() method takes 2 arguments, which are the two alpha values.
The returned struct has the method enable_background() which you will need to call on any background you want to blend the object into.
For any pixel on which an object is being drawn on top of a background, the final colour will be:
\[ \text{min}(\alpha_0 * \text{object_pixel} + \alpha_1 * \text{background_pixel}, 31) \]
Where \( \alpha_0 \) is the first argument to object_transparency and \( \alpha_1 \) is the second.
Normally you would want \( \alpha_0 + \alpha_1 = 1 \) but that isn’t strictly necessary and you can use this to cause other effects like over-saturating certain colours.
// Fetch the background ID to enable this background for object transparency
let background_id = background.show(&mut frame);

// Ensure that the sprite has it's graphics mode set to `AlphaBlending` or
// it won't blend
Object::new(sprite)
   .set_graphics_mode(GraphicsMode::AlphaBlending)
   .show(&mut frame);

// Enable blending and make objects appear at 50% transparency by taking
// half the colour from the object and half the colour from the background.
frame.blend()
   .object_transparency(num!(0.5), num!(0.5))
   .enable_background(background_id);
Brighten / darken

This is the simplest blend effect.
You can fade given layer towards black or white with the .brighten() or .darken() methods.
In the example to the right, the background is being faded towards white.
The .brighten() and .darken() take a single argument, which is how much to fade.
0 will leave it un-touched and 1 will result in fully black or white.
Only the enabled backgrounds will fade. For objects, things are a little more complicated.
You can enable objects for fading with the .enable_object() method, and in that case, any object with their GraphicsMode set to AlphaBlending will fade towards either black or white by the given amount.
However, you can also enable object transparency when enabling fade blending, which works like the section above.
But, if you have object fading and object transparency enabled, then any part of the object which overlaps with the background it is being faded into will show with transparency, but any object which doesn’t overlap with the background will be faded.
// Fetch the background ID to enable this background for object transparency
let background_id = background.show(&mut frame);

// Lighten the background quite close to white
frame.blend()
   .brighten(num!(0.75))
   .enable_background(background_id);
Alpha blending

Alpha blending lets you blend one layer into another using the same idea as object transparency. However, with alpha blending, you can also blend backgrounds into each other, as shown in the example to the right where two identical offset backgrounds are faded into each other.
Alpha blending will only ever blend things from the top layer into the bottom layer.
And only items which in Priority order render the top layer above the bottom layer.
If you don’t do that, then no blending will occur.
To start alpha blending, call the .alpha() method on the blend, passing \( \alpha_\text{top} \) and \( \alpha_\text{bottom} \) as its two arguments.
You then need to configure the two layers which will be blended into each other by calling the various method on the BlendAlphaEffect.
use agb::display::Layer;

// This background has priority 0
let bg0_id = background0.show(&mut frame);
// This background has priority 1
let bg1_id = background1.show(&mut frame);

frame.blend()
   .alpha(num!(0.75), num!(0.25))
   .enable_background(Layer::Top, bg0_id)
   .enable_background(Layer::Bottom, bg1_id);
You can also enable objects on any layer with the enable_object() method.
Do note however that blending does not work between two objects, only background-background, object-background and background-object blending works.
An option for the layer is the backdrop.
This is the 0th colour in the palette, and what you select as the transparent colour in the call to include_background_gfx!.
It is always rendered behind everything, so enabling it in the top layer will not do anything.
But you can use it to fade towards a single colour.
You can change this colour at any time using
frame.set_background_palette_colour(0, 0, new_colour);Windows
Windows on the Game Boy Advance are used to selectively enable or disable certain backgrounds, objects or effects on some rectangular area of the screen. You can use them to only enable blending in certain areas rather than the entire screen, or to cut off a background in some location.
There are two rectangular windows and an object window. We’ll cover the rectangular ones first.
Window areas
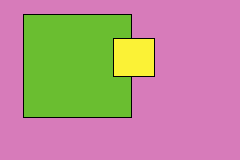
On the right you’ll see a diagram of how the two rectangular areas work on the Game Boy Advance.
Yellow is Win0 and green is Win1.
For each window, you can state what you would like to be visible within that space, this being specific backgrounds, objects or if blending should be enabled.
A certain pixel will always be a member of one of Win0 or Win1 (with Win0 taking priority over Win1), or it’ll be outside of both.
The special WinOut (the pink area in the diagram) is any pixel which isn’t in a window.
The WinOut is also configurable in the same way as the Win0 and Win1 windows are.
If you don’t configure anything to render in a certain window area, then it’ll only show the backdrop colour.
Windows are configured using the .windows() method on the current frame.
let bg1_id = background1.show(&mut frame);
let bg2_id = background2.show(&mut frame);

let mut window = frame.windows();
window
    .win_in(WinIn::Win0)
    .enable_background(bg1_id)
    .set_pos(rect(pos, vec2(64, 64)));

window.win_out().enable_background(bg2_id);
Here we enable background 1 inside Win0 and background 2 inside WinOut so outside of the 64x64 area we see background2 but inside this area we see background1.
Object windows
You can also use objects as a window.
Any non-transparent pixel in the object will be considered part of that window.
Mark an object you want to become a window with the GraphicsMode of Window.
Then, configure the win_obj() in the same way that you would the rectangular ones.
Again, anything not inside the object windows, or Win0 and Win1 will be considered part of WinOut and is configured using the .win_out().