Keeping score
We have most of a game, but we should now show the scores of the players. There is one main question when wanting to display anything to the screen on the Game Boy Advance: should you use backgrounds or objects?
There are advantages and disadvantages to each. For backgrounds, there are at most 4 on screen at once, so you need to be careful with the layering of your game to make sure you don’t run out. With objects, you can have at most 128 of them on the screen. But each unique object requires some video RAM to store the graphics information, and that doesn’t have space for 128 large sprites. Backgrounds can be scrolled to an arbitrary location, but multiple items on a single background will be offset by the same value. With objects, you can put them anywhere you want on the screen.
For our pong game, we’ll make the bad decision of displaying the player’s score using backgrounds, and the CPU’s score using objects so you can get a feel of doing both.
You’ll notice that in both cases we’re not using a text rendering system for rendering the text.
This is intentional, it can be quite complicated and CPU intensive to render text, so it is often left for things which have to be dynamic or translatable.
And for this example, it’s not worth learning how to render text yet with agb.
Please refer to the text rendering deep-dive if you’re interested in text rendering after you’ve finished this section.
How the score will work in our pong game
We’ll implement a simple 3 life system. This will be displayed using a heart icon in the top of the screen which becomes an outline after each loss. If you lose while you have 0 lives, you lose the game.
Tracking score
Firstly, let’s add the score to the Paddle objects:
pub struct Paddle {
    pos: Vector2D<Fixed>,
    health: i32,
}
and in the new() function, initialise it to 3.
We’re going to use it for displaying the health as hearts and decrementing it when ball touches the side of the screen. Add these functions to Paddle struct.
pub fn health(&self) -> i32 {
    self.health
}

pub fn decrement_health(&mut self) {
    self.health -= 1;
}
We can then reduce the health in the ball’s update function (you’ll have to change the update function to take &mut Paddle):
if potential_ball_pos.x <= num!(0) {
    self.velocity.x *= -1;
    paddle_a.decrement_health();
} else if potential_ball_pos.x >= num!(agb::display::WIDTH - 16) {
    self.velocity.x *= -1;
    paddle_b.decrement_health();
}
The player’s score (backgrounds)
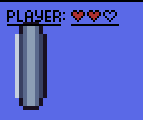
We’ll use the player-health.aseprite file for the assets here. In this section, you’ll get something similar to to what’s shown on the right.
With the tiles marked, it looks as follows:

Static setup
Since we want the player’s score to be displayed above the backdrop of the game, we can import the new tiles and make them available by adding them to the include_background_gfx!() call:
include_background_gfx!(
    mod background,
    PLAY_FIELD => deduplicate "gfx/background.aseprite",
    SCORE => deduplicate "gfx/player-health.aseprite",
);
With these tiles imported, we now need to create a new background to store the player details. So next to where the current background gets created, create the player health background
let mut player_health_background = RegularBackground::new(
    Priority::P0,
    RegularBackgroundSize::Background32x32,
    TileFormat::FourBpp,
);
We’ll create it with priority 0 because we want it displayed above everything.
The first 4 tiles in the background are the word PLAYER:, so we’ll render those to the screen as follows:
for i in 0..4 {
    player_health_background.set_tile(
        (i, 0),
        &background::SCORE.tiles,
        background::SCORE.tile_settings[i as usize],
    );
}
And just below the call to bg.show(&mut frame), also call player_health_background.show(&mut frame).
If you run this, you’ll see the PLAYER: text appear in the top left of the screen.
Ideally we’d want a bit of padding, so let’s scroll the top left of the background a little to show pad it out by 4px.
player_health_background.set_scroll_pos((-4, -4));The offset is negative, because the scroll pos is where to put the top left of the Game Boy Advance’s screen. By offsetting it by -4px, it will move the background 4px right and down.
You’ll also notice however that all the sprites are being rendered above the text.
This is because if an object and a background have the same priority, then the object will be displayed above the background.
So we need to lower the priority of the objects which we can do with the .set_priority() call.
Priority P1 is a sensible option for these objects, so we’ll do that for the ball and the paddle.
Object::new(sprites::BALL.sprite(0))
    .set_pos(self.pos.round())
    .set_priority(Priority::P1)
    .show(frame);
And similarly for the 3 paddle sprites.
Dynamic setup
Now we’ll want to display the actual score.
The full heart is in tile index 4, and the empty one is in tile index 5.
So let’s display up to 3 hearts with the given tile indexes by placing the following code after the ball.update() function call.
for i in 0..3 {
    let tile_index = if i < paddle_a.health() { 4 } else { 5 };
    player_health_background.set_tile(
        (i + 4, 0),
        &background::SCORE.tiles,
        background::SCORE.tile_settings[tile_index],
    );
}
This will put the correct number of hearts on the player’s side.
The CPU’s score (objects)
Download the cpu-health.aseprite file and add it to your gfx folder.
For the CPU’s score, we’ll use objects to display the current health remaining. You can import the sprites in the same way as the existing ones are imported. However, these sprites are 8x8 rather than 16x16, so can’t be in the same aseprite file, but they can be imported together meaning their palettes will be optimised together:
include_aseprite!(
    mod sprites,
    "gfx/sprites.aseprite",
    "gfx/cpu-health.aseprite",
);
For this, both the CPU “text” itself (not to be confused with actual text rendering) as well as the CPU’s hearts are both spread across 2 frames in the aseprite file.
Passing the frame index to the sprite() function gives us the desired combined sprite.
fn show_cpu_health(paddle: &Paddle, frame: &mut GraphicsFrame) {
    // The text CPU: ends at exactly the edge of the sprite (which the player text doesn't).
    // so we add a 3 pixel gap between the text and the start of the hearts to make it look a bit nicer.
    const TEXT_HEART_GAP: i32 = 3;

    // The top left of the CPU health. The text is 2 tiles wide and the hearts are 3.
    // We also offset the y value by 4 pixels to keep it from the edge of the screen.
    //
    // Width is in `agb::display::WIDTH` and is the width of the screen in pixels.
    let top_left = vec2(WIDTH - 4 - (2 + 3) * 8 - TEXT_HEART_GAP, 4);

    // Display the text `CPU:`
    Object::new(sprites::CPU.sprite(0))
        .set_pos(top_left)
        .show(frame);
    Object::new(sprites::CPU.sprite(1))
        .set_pos(top_left + vec2(8, 0))
        .show(frame);

    // For each heart frame, show that too
    for i in 0..3 {
        let heart_frame = if i < paddle.health() { 0 } else { 1 };

        Object::new(sprites::HEART.sprite(heart_frame))
            .set_pos(top_left + vec2(16 + i * 8 + TEXT_HEART_GAP, 0))
            .show(frame);
    }
}
Don’t forget to call show_cpu_health(&paddle_b, &mut frame); before frame.commit()!
Running the example again you’ll see the health bar for the player and the CPU, and you wouldn’t be able to tell that they are using completely different rendering mechanisms.
What we did
This concludes the pong game tutorial. In this section you’ve learned how to use backgrounds and objects to display dynamic information, and have a feel for how to use both for the task.
In this entire tutorial, you’ve learned:
- How to create and run a brand new game for the Game Boy Advance
- How to load graphics and display them on the screen, with both backgrounds and objects
- How to include sound effects and music in your game
- How to do efficient calculations of non-integer numbers to create more dynamic gameplay
- How to use your knowledge of Game Boy Advance graphics to display information to the player
Next you can take a look at some of the articles to understand some of the more advanced features of the library and hardware in general.
Exercises
- Add an end to the game in whatever way you see would work. Here are some suggestions:
- Replace the backgrounds with a new one displaying a win or lose screen, and allow the player to restart the game
- Add some particle effects by creating lots of sprites and moving them around in the screen
- Add some ‘juice’ to the game. Some suggestions if you’re not sure what to add:
- Use scroll position for screen shake
- Use sprites for particle effects when the ball hits a paddle
- Animate the ball, or add some trail effect with more sprites
- Make the sound effects change pitch randomly
- Slow the game down when you’re about to win / lose
- Take a look at the agb examples and see if you can incorporate some of the more advanced effects into your game like affine sprites / backgrounds or blending
- Share your finished game with us in the show and tell section of our community! We love to see what people have made with
agb.