Tiled backgrounds
Tiled backgrounds are used to show the backdrop of games, along with any other mostly-static content such as heads-up-displays (HUDs) or menus. They are used in almost every commercial GBA game. In a tiled background, the background is made of individual 8x8 tiles which can be repeated as many times as needed.
The reason you’d need to use a tiled background is because of how much RAM and CPU time it takes to display a GBA-screen sized background. They also allow for easy scrolling, and with reused tiles you can update large amounts of the screen very efficiently.
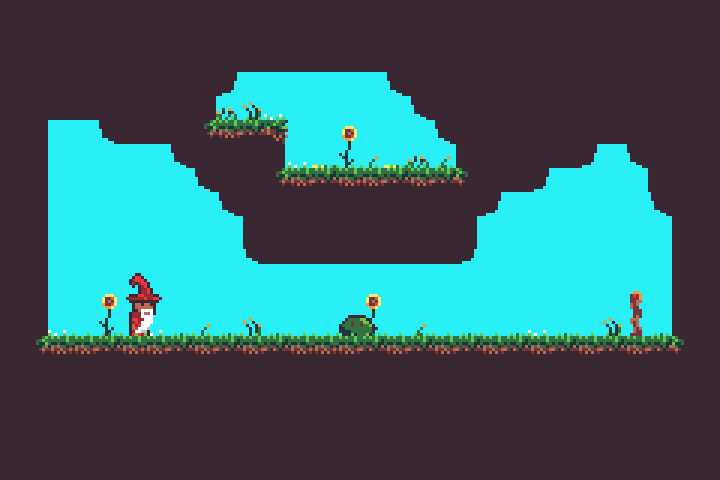
In the example above, you can see repeated tiles used for the brown background along with the flowers, grass and ground. The only part of the above example that isn’t a background is the wizard on the left and the slime in the centre.
The following sections build up an example showing a simple scene.
If you want to follow along, you can download beach-background.aseprite from here.
Copy this into a gfx folder in the same directory as the src directory for your project.
Tile set importing
In order to display tiles on the screen, we’ll first need to import it into the game.
A collection of imported tiles is referred to as a TileSet.
You wouldn’t normally create a TileSet manually, and instead have it created using the include_background_gfx! macro.
agb natively supports importing aseprite, png or bmp files for backgrounds.
The syntax is as follows:
use agb::include_background_gfx;

include_background_gfx!(
    mod background,
    BEACH => deduplicate "gfx/beach-background.aseprite"
);
This creates a background module which contains a tileset named BEACH.
The deduplicate parameter means that agb will take tiles with the same content and merge them into the same tile.
This saves space in the final ROM, and saves video RAM during runtime, since duplicate tiles will only appear once.
Palette setup
Although the Game Boy Advance can display 32,768 colours, the background tiles are stored in either 4 bits per pixel (16 colours) or 8 bits per pixel (256 colours).
You will need to tell the video hardware what colour to use for each of the pixels in the TileSet.
This is stored in the palette, which is also included in the module created by include_background_gfx!.
To set the palettes available for backgrounds, use the set_background_palettes method on the Graphics instance.
use agb::{
    include_background_gfx,
};

include_background_gfx!(
    mod background,
    BEACH => deduplicate "gfx/beach-background.aseprite"
);

#[agb::entry]
fn main(mut gba: agb::Gba) -> ! {
    let mut gfx = gba.graphics.get();
    gfx.set_background_palettes(background::PALETTES);

    loop {}
}
If you need to change individual palette colours after initialisation (for example, to animate the background colour or to change the background to a new set of palettes), you can use the set_background_palettes() method on the current GraphicsFrame. This will change the palettes at the same time as the background swap rather than at the call (so on .commit()).
RegularBackground
With a TileSet ready and a palette set up, we need to actually declare which tiles to show where on the screen.
This is done using the RegularBackground struct.
The RegularBackground reserves some video RAM to store which tile goes where and other metadata about it like it’s palette number and whether it should be flipped.
RegularBackground::new takes 3 arguments.
The priority (which we’ll set to Priority::P0 for now), a tile format which you can get from background::BEACH.format() and a size.
The size of the background can be one of 4 values.
The Game Boy Advance has a screen size of 240x160 pixels which is equal to 30x20 tiles, and the smallest background is 32x32 tiles.
Backgrounds can be scrolled around, and will wrap around the screen if the edge of the background is out of view.
The bigger the background, the more video RAM will get used by both the tiles within it (since each tile in a background must be stored in vram, even if it isn’t currently visible on the screen) and also more video RAM is needed to store the actual list of tile indices.
In most cases, Background32x32 is the best choice since you can cover the entire screen and it uses very little video RAM.
 However, there are also cases where other sizes are a good choice.
The example to the right uses a `64x32` background to implement the parallax background.
However, there are also cases where other sizes are a good choice.
The example to the right uses a `64x32` background to implement the parallax background.
For this example, we’ll just create a 32x32 background, but it is important to always consider the background size when creating one in your game.
use agb::{
    display::Priority,
    display::tiled::{
        RegularBackground, RegularBackgroundSize,
    },
    include_background_gfx,
};

include_background_gfx!(
    mod background,
    BEACH => deduplicate "gfx/beach-background.aseprite"
);

#[agb::entry]
fn main(mut gba: agb::Gba) -> ! {
    let mut gfx = gba.graphics.get();
    gfx.set_background_palettes(background::PALETTES);

    // Create the background tiles ready for us to display on the screen
    let mut tiles = RegularBackground::new(
        Priority::P0,
        RegularBackgroundSize::Background32x32,
        background::BEACH.tiles.format()
    );

    loop {}
}
You’ll now want to put tiles onto the background, ready to display them.
This is done using the set_tile() method.
Let’s loop over the width and height of the Game Boy Advance screen and set the tile in the background, so after the tiles are created, something like:
for y in 0..20 {
    for x in 0..30 {
        let tile_index = y * 30 + x;

        tiles.set_tile(
            (x, y),
            &background::BEACH.tiles,
            background::BEACH.tiles.tile_settings[tile_index],
        );
    }
}
If the included .aseprite file is the exact dimensions of the GBA screen
(240x160 pixels), you can also simply call .fill_with()
on the RegularBackground you created with a reference to the imported TileSet:
tiles.fill_with(&background::BEACH);Note that if you run either approach, you still won’t get anything showing on screen until you show the background on the frame, which we’ll do in the next section.
Showing a background on the screen
To show a background on the screen, you’ll need to to call the .show() method passing in the current GraphicsFrame.
See the frame lifecycle article for more information about frame lifecycles, but to show our example so far, replace the loop with the following
let mut gfx = gba.graphics.get();

loop {
    let mut frame = gfx.frame();
    background.show(&mut frame);
    frame.commit();
}
Background scrolling
One of the key things you can use backgrounds to do is to display something scrolling. You can use this to make your level bigger than the world map, or to do some parallax effect in the background.
You can scroll the background with the .set_scroll_pos() method.
The scroll_pos passed to the .set_scroll_pos() method is effectively the ‘camera’ position.
It chooses where the top left camera position should be.
So increasing the x coordinate will slide the background to the right, to ensure that the top-left corner of the Game Boy Advance’s screen is at that pixel.
Backgrounds will wrap around if they are pushed off the edge of the screen. See the scrolling example for an example of using the scroll position.
Multiple backgrounds and priorities
The Game Boy Advance has the ability to show up to 4 background concurrently. These can be layered on top of each other to create different effects like the parallax effect above or to always show certain things above the rest of the game.
Displaying multiple backgrounds
You can display multiple backgrounds at once by calling the .show() method on each background passing the same frame instance.
If you try to show more than 4 backgrounds, then the call to .show() will panic.
Transparency
When two backgrounds are rendered on top of each other, the lower background will be visible through the transparent pixels in the backgrounds above. Only full transparency is supported, partial transparency is ignored.
Any pixels with no background visible at all will be displayed in the first colour in the first palette.
You can alter what colour this is in the include_background_gfx! call.
use agb::{
    include_background_gfx,
};

include_background_gfx!(
    mod background,
    "00bdfe", // the hex code of the sky colour we want to use as the background layer
    BEACH => deduplicate "gfx/beach-background.aseprite"
);

#[agb::entry]
fn main(mut gba: &mut agb::Gba) -> ! {
    let mut gfx = gba.graphics.get();
    // by setting the background colour here, the first colour will be the sky colour,
    // so rather than filling the screen with black you will now instead have it
    // filled with blue. Even though we don't show anything yet.
    gfx.set_background_palettes(background::PALETTES);

    loop {}
}
There is also a special tile setting you can use in the call to set_tile(), TileSetting::BLANK.
This is a fully transparent tile, and if you ever want a tile in your background to be fully transparent, it is better to use this one for performance.
Priority and interaction with objects
There are 2 things which impact which background gets displayed above other ones.
The priority, and the order in which you call .show().
Backgrounds with higher priorities are rendered first, and so are rendered behind those with lower priorities.
Between backgrounds with the same priority, the one which called .show() first will render before (and therefore behind) the later ones.
When interacting with objects, objects with the same priority as backgrounds are always displayed above the background. You can use this to display the Heads Up Display (HUD) above the player by putting the HUD background on priority 0, the main background on priority 3 and the player also on priority 3.
See the hud example for an example of how to use priorities to draw a heads up display above the scene we’ve been working on.
Infinite maps
Often in your game you’ll want maps that are larger than the maximum background size of 64x64. It could be a platformer with large levels, or a large map in an RPG. Or maybe you want a scrolling background that’s got a longer repeat than every 64 tiles.
The InfiniteScrolledMap is a used to manage a map that’s larger than the background size.
It works by changing the tiles that aren’t currently visible on the screen and then allowing you to scroll to them.
This creates a seamless, ‘infinite’ map.
The key method in InfiniteScrolledMap is the .set_scroll_pos() method.
This method takes a position to scroll to and a function which accepts a scroll position (working in the same way as the regular .set_scroll_pos() on a RegularTiledBackground) and a callback function.
The callback function is called for every tile it needs to fill with some data, which will be as minimal as possible and attempt to reuse already drawn tiles.
So the .set_scroll_pos() method assumes that this function is pure, and the same between calls.
See the infinite scrolled map example for an example of how to use it with a large static map.
In the example linked above, the map tiles are larger than the provided background size (60x40 vs. 32x32), but could still fit in a 64x64 space. Using the infinite scrolled map however allows us to wrap the background at the edge of this provided background rather than being forced to wrap it at 64 tiles wide. This will also use less video RAM while the game is running since we need fewer tiles loaded at once to fill the screen.
Generally, when you’re working with InfiniteScrolledMaps, you’ll want to use 32x32 backgrounds as the underlying size, since there is very little advantage to using larger backgrounds.
256 colours
So far every example has used 16-colour tiles or 4 bits per pixel.
Each tile in a 16-colour tile can have at most 16 colours, but you can use different palettes for each tile.
Most of this has been hidden by the include_background_gfx! macro.
However, it does limit the number of colours you can have in your background a little. If you need to bypass this limit, you can use 256 colour tiles (or 8 bits per pixel). This has the disadvantage that it takes twice as much video RAM to store the tile data, but the advantage that it gives you more freedom as to how to put the colours in your background.
Import a 256 colour background by adding the 256 modifier to the call to include_background_gfx!().
use agb::include_background_gfx;

include_background_gfx!(
    mod background,
    BEACH => 256 deduplicate "gfx/beach-background.aseprite"
);
Also ensure that when you create the RegularBackground, you pass TileFormat::EightBpp (or using the .format() method on the tile data like we’ve been using in the other examples here).
A background must be in one of FourBpp or EightBpp mode.
Tile effects
Each tile in the Game Boy Advance can be flipped horizontally or vertically.
This is controlled by the .vflip and .hflip methods on TileSetting.
You can also set the palette index using the TileSetting.
But for backgrounds imported using include_background_gfx!() you probably don’t need that, since the palettes will have been optimised and aren’t guaranteed to be the same each time you compile your game.
Animated tiles
If you have some tiles you’d like to animate (such as some flowing water, or flowers blowing in the breeze), it can be quite inefficient to replace every instance of a tile with the animation every frame. What’s much faster is just replacing the one copy of the tile that’s been repeated across the background 10s or even 100s of times rather than resetting the entire tile data.
To change which tile is being used, use the replace_tile method on the Graphics instance.
gfx.replace_tile(
    tileset1, 4, tileset2, 5
);
This will replace every occurrence of tileset1’s tile 4 with tileset2’s tile 5.
Animated tiles work on tile indexes and only change the tile data itself and not the state of the tiles used.
The tiles being replaced will retain their hflip and vflip, so you can animate tiles in transformed states.
Therefore, animated tiles do not work with the deduplicate option in include_background_gfx!(), since this will flip tiles in order to reduce the number of exported tiles.
It will also not change the palette index for those tiles, so only animate tiles which result in the same palette index.
See this example for an example of an animated background in a very basic example.
Dynamic tiles
Sometimes you don’t know what needs to be drawn on a tile ahead of time.
DynamicTiles are a powerful way to show tiles whose contents are decided at runtime in your game.
Their current main use is for text rendering, where they are used as the target for rendering text.
Currently only 16-colour dynamic tiles are supported and can only be shown on 4 bits per pixel backgrounds via the set_tile_dynamic16() method on RegularBackground.
// by default, `DynamicTile`s are left with whatever was in video RAM before it
// was allocated. So you'll need to clear it if you're not planning on writing
// to the entire tile.
let dynamic_tile = DynamicTile16::new().fill_with(0);

// my_background here must have FourBpp set as it's TileFormat or you won't be able
// to use DynamicTile16 on it.
let my_background = RegularBackground::new(
    Priority::P0,
    RegularBackgroundSize::Background32x32,
    TileFormat::FourBpp
);

// Note that you can pass a TileEffect here which would allow you to flip the tile
// vertically or horizontally if you choose to.
my_background.set_tile_dynamic16((0, 5), dynamic_tile, TileEffect::default());
my_background.set_tile_dynamic16((0, 5), dynamic_tile, TileEffect::default().hflip(true)); // flip the tile horizontally
See the dynamic tiles example for a really basic example, or the tiled background text renderer for a much more in-depth example. If you have any examples where dynamic tiles are the correct tool which isn’t font rendering, please let us know by opening an issue in the agb repo.
Affine backgrounds
The Game Boy Advance can perform basic transformations like rotation and scaling to backgrounds and objects before they are displayed on screen. These transformations are used to perform many of the graphical tricks which give Game Boy Advance games their unique aesthetic.
Affine background limitations
One thing to note before using affine backgrounds for everything in your game is that they come with some fairly strict limitations which make them harder to use than regular backgrounds
- You can have at most 2 affine backgrounds at once. Each affine background takes up 2 regular background slots, so you can have 2 affine backgrounds, 1 affine and 2 regular or 4 regular backgrounds.
- Affine backgrounds only support 256-colour mode (8 bits per pixel).
Therefore, each tile uses up more video RAM than using the normal 16-colour mode (4 bits per pixel).
So make sure to import tiles using the 256 colour option in
include_background_gfx!. However, this isn’t so much of a problem because: - Affine backgrounds can only have 256 distinct tiles. Whereas regular backgrounds can fill the entire screen with distinct tiles, affine backgrounds can’t. 256 tiles runs out very quickly. And to make matters worse:
- Affine background tiles cannot be flipped. Each tile appears as it does when copied over to video RAM. So you cannot use the same deduplicate trick used in regular backgrounds.
However, if you can work around these limitations, you’ll have the ability to make graphical effects like the ones shown in the affine backgrounds example, where we add a subtle camera rotation and zoom while moving around. Do note that these limitations are actual hardware limitations1.
Affine background creation
Before we dig into the transformations themselves, we’ll quickly cover how to create and display affine backgrounds.
Importing the graphics
Affine background tiles are imported using the same include_background_gfx! macro as regular backgrounds.
However, ensure that you pass the 256 option to import them as 256-colour tiles, and that you do not pass the deduplicate option.
use agb::include_background_gfx;

include_background_gfx!(
    mod background,
    TILES => 256 "gfx/background-tiles.aseprite",
);
Setup the palette
Palette setup works in exactly the same way as regular backgrounds.
gfx.set_backgroud_palettes(background::PALETTES);Create the AffineBackground
These also work very similarly to regular backgrounds.
However, the constructor for AffineBackground takes some different arguments.
The priority works in exactly the same way as regular backgrounds, with higher priorities being rendered first, so backgrounds with the lower priority are drawn on top of backgrounds with a higher priority.
And similarly, objects with the same priority as an affine background are rendered above the background.
The sizes available to affine backgrounds are different to regular backgrounds. Affine backgrounds can only be square, and the smallest one (16x16 tiles) is smaller than the console’s screen and the largest (128x128 tiles) is many times the size. You have similar trade-offs with the amount of video RAM used for the actual background data as with regular backgrounds. You should use the smallest background you can which fits the game you’re making on it.
While all regular backgrounds wrap around the screen (so scrolling to the right far enough will eventually show the left hand side of the background), affine backgrounds have the option not to wrap around the screen.
This is provided by the AffineBackgroundWrapBehaviour.
Play around with some of the affine background examples to see how changing these settings alters how it works.
Putting tiles on screen
The set_tile method takes different arguments to the regular background case.
Instead of taking TileSettings, you give it a single tile_index.
This is due to the limitation of affine backgrounds that you cannot flip tiles, so there are no settings to tweak.
Showing the background on the screen
As with most graphical things in agb, you show AffineBackground on the screen by calling the .show() method passing in the current frame.
let mut gfx = gba.graphics.get();

loop {
    let mut frame = gfx.frame();
    background.show(&mut frame);
    frame.commit();
}
Transformations
Please see the dedicated affine backgrounds and objects chapter to see how to do transformations.
-
Technically you could have 256 distinct tiles per affine background so you could get 512 total between both backgrounds. However,
agb’s tile allocation isn’t sophisticated enough for this, and you would also need to specify at creation time whether you’d want this because you could not deduplicate between the backgrounds. To avoid this complication,agbdoesn’t support this mechanism. ↩